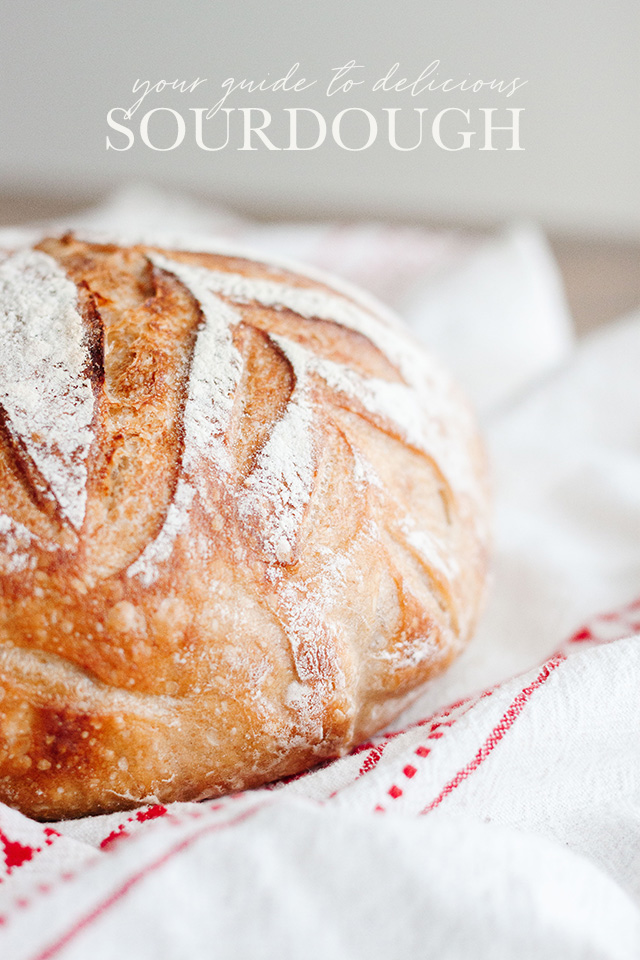
Baking Sourdough Bread: tips, photos, my recipe & more!
+ Lame: scoring tool to create the patterns on the top of your loaf.
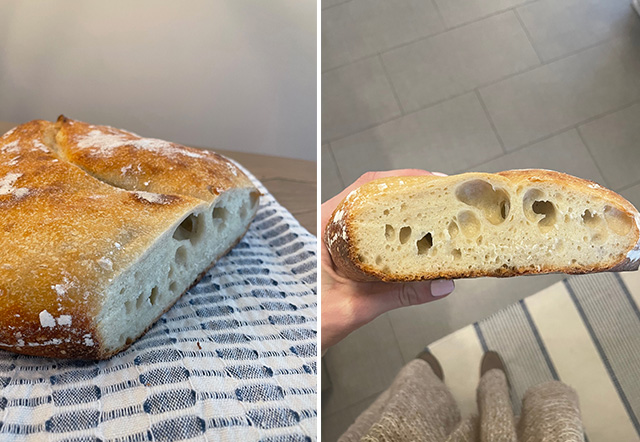
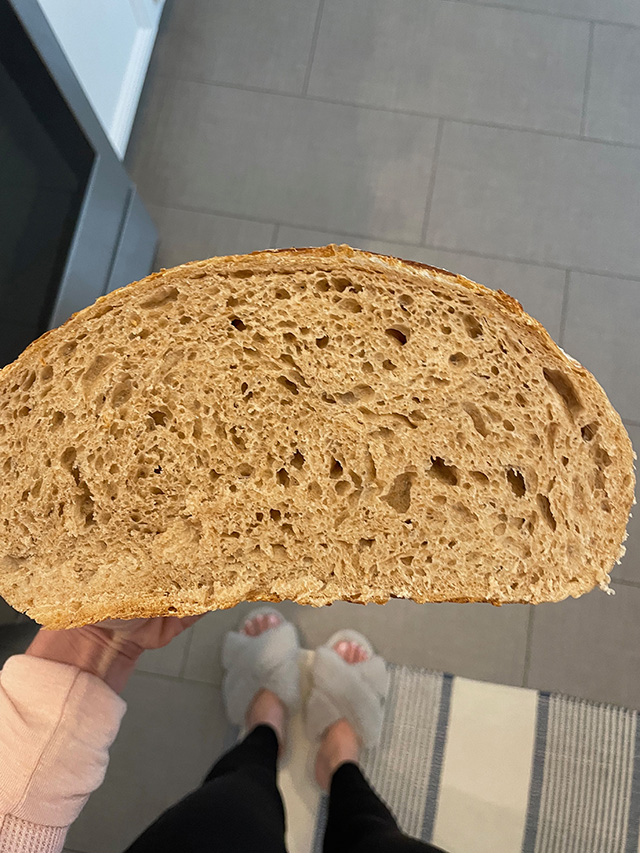
After weeks of tweaking things, this loaf below is when I finally hit my groove. I decided to use less whole wheat flour, a little more starter in the recipe, and finally perfected the proofing time AND learned an important technique in shaping (spoiler alert: shape it twice!) THIS is what you call an "open crumb" and from what I've read and seen, it's the ideal crumb ;)

1. FEED your starter TWICE before baking, making sure it’s healthy and bubbling, has doubled in size since feeding. Do the “float test” to be sure it’s ready to use! Fill a glass of water and drop 1 tsp of starter in the stop. If it floats, it’s ready to use. If it sinks, it needs more time.
This is how your starter will look right after feeding. The rubber band is placed at the level of the starter, so we can tell when it has doubled in size.


This is what your starter will look like in a healthy, bubbly and active (ready to use!) state:


2. Make your “SPONGE”. In the evening, after feeding it for the second time and making sure it's healthy and bubbling, mix the following together with a rubber spatula:
90g starter
120g whole wheat flour
120 g filtered, lukewarm water
*Cover with plastic wrap and set on counter overnight
This is what it will look like when you first mix it up:

3. DOUGH. The next day (I start in the afternoon, but just pick a time where once you start this process, you can finish it all at once, following the timing with each step) we’ll mix up our bread dough and do a lot of folding (kneading).
-Add 750g filtered, lukewarm water to the overnight sponge. Mix with a whisk until completely dissolved.
- Add 20g of salt and stir in with whisk (yes, it’s a lot, but you need all of it!)
- Add 800g bread flour & 200g whole wheat flour (if you’re only using white bread flour, use 1000g of it-- this is what I've been doing lately and it's been incredibly tasty!) and mix all of this together with your hands, removing jewelry. This will be VERY sticky-- that’s expected!
*Once mixed set aside with towel covering bowl for 50 minutes.
This is what your sponge will look like the next day (it will have more than doubled and have some bubbles like this-- that's what you want!)


4. FOLDING. After 50 min of resting, add another 50g of lukewarm water to the top and fold it in using the “stretch and fold to the middle” method, described below. This will feel like a lot of water, but it’s what makes the bread so moist.
To fold, gently start on top like a clock. Using wet hands, stretch the dough up and then fold the top to the center. Turn the bowl ¼ turn and repeat until you've done 4 folds (this is how you’ll fold in the following steps as well).
You will do 4 folds/rotations of the bowl in total, each time you fold.
*Let sit 30 minutes.
5. After 30 min, fold again. The actual folding only takes about 30 seconds.
Wait 30
Fold again
Wait 30
Fold again
Wait 30
Fold again
*You will do 5 folds with 30 minutes in between each fold. (I have found that doing it just 3 times works as well, too, if my timing doesn’t allow the extra hour.)
These photos illustrate the progression of what the dough will look like after folding:
Left is right after mixing the dough. Right is after the first fold.


6. After the last fold, let it sit to proof, covered with plastic wrap and a towel, then left somewhere that is evenly warm. I have found between 75-80 degrees is best. Do not set it in front of a fireplace where it will heat unevenly. Sitting it in a room with a space heater or while laundry is in the dryer, or a warm storage room is a great idea! At this temp, it has usually doubled in size, which is what we want, by 2.5-3ish hours of resting. This will vary based on temp and humidity levels. The most important thing is that your dough has doubled in size and is pulling away from the edges of the bowl. It should also be quite bouncy. When you poke it, the dough should spring back and not leave a dent. This could take anywhere from 2-5 hours, so be sure to check it!
7. SHAPING & PROOFING. Our last step of the process is to grab two bowls or flour-dusted proofing bannetons. Place parchment paper in bowls if not using proofing baskets and spray them with a non-stick spray to help the dough not stick.
Dust your clean countertop with flour (most use rice flour for this)
Dump your dough out and split the dough in half using flour-dusted hands or a dough cutter.
Working with one half of the dough, begin to shape your bread into the form you want it to bake in. I recommend this shaping tutorial and then this one, where he teaches to shape twice! Once done, place it in the proofing bowl with parchment for 15-30 minutes. Repeat bread shaping technique one more time, then place it back in the bowl.
Place in fridge, covered with a towel, plastic wrap or a shower cap overnight.
8. PREPARE TO BAKE. Baking is the easy part! Preheat to 475. While the oven is preheating, place your Dutch Oven inside the oven to also heat up. Once it’s preheated, remove the Dutch Oven carefully!
This is what your dough should look like right out of the fridge:

9. SCORE. This refers to using an oiled, sharp knife, or bread lame, to cut a design or slit in the top of the bread. This allows the bread to open and rise in intentional places and it’s also quite beautiful! (Google scoring patterns if you want to get creative, otherwise one simple line down the middle or an X shape will do!)
Dust the dough with flour before scoring. I use a flour sifter to do this.


10. Move your newly scored dough to the (hot) Dutch Oven by lifting the parchment paper and transferring it. Right before placing the Dutch Oven with your dough into the oven, put 2 ice cubes on the outside of the parchment paper, but inside the Dutch Oven, to help aid with increased steam.
11. BAKE!
* 27 minutes with lid on at 475 degrees.
* Lower oven temp to 450 and remove lid and bake 15 minutes with lid off, until browned. This is the perfect amount of time for an easily chewable crust. If you want a crunchier crust, bake for 5-8 minutes longer without the lid.
+ Is your bread not rising? You probably need to let it proof longer (the most important thing is to make sure it's doubled in size and is pulling away from the edges of your bowl!) in a warm setting and make sure the starter is active and bubbly when you use it. Be sure you're using lukewarm, filtered or bottled water in the recipe and any time you feed the starter. Make sure your dough is covered well when proofing so it doesn't develop an outer layer of crust. Finally, increased steam helps your loaf rise, so adding a couple ice cubes in your Dutch Oven is super helpful!
+ Is your bread dense and gummy? This is one of the most common problems and it happened to me in my first few bakes. It comes down to not letting it proof as long as it needs to and having an inactive starter. Fix those two things and you'll be on your way!
+ Does your bread not have enough flavor for you? Be sure you added the salt ;) and you can play around with the amount of starter that is in your recipe. This recipe originally called for 40 grams, but I upped it to 90g in order to increase the sour flavor (more starter also decreases the amount of time it'll take to proof, as it accelerates the process). Finally, the longer you go without feeding your starter, the more sour it will taste, so if you like the sour taste, stick it in your fridge while you're not using it and only pull it out to bake with. This is what I do!
+ The bottom of my loaf is burnt, how do I prevent that? Some recipes tell you to preheat the Dutch Oven for an hour before baking and when I did this, it burned the bottom of the loaf, so now I only preheat the Dutch Oven while the oven is preheating.
Happy Baking
from Michaela Noelle Designs https://ift.tt/X0abmlP
via gqrds
0 Response to "Baking Sourdough Bread: tips, photos, my recipe & more!"
Posting Komentar